how to draw a 3d flower in illustrator
3D Objects in Illustrator?
Yes, Illustrator will allow you to do a decent amount of 3D work, but working with 3d objects in Illustrator tin can be a hurting if you don't know what you're doing. The other matter is that the controls for 3D objects in Illustrator aren't that direct-forward. Irresolute the colors of your objects or text can actually be a pain, just I have some tips that will make working with 3D objects in Illustrator a little easier for yous.
Creating 3D Objects in Illustrator
Today, we are going to piece of work with text. This is one of the most popular things to do with 3D is to make 3D typography. Choose a assuming typeface without a lot of extra frills and serifs. Go along it elementary and your type will expect practiced and you tin can avoid headaches later. The typeface I chose is Mensch Bold. I made it nice and large on my canvas, and the proportions don't really matter, because I am going to be re-positioning each letter individually afterwards.


The best dominion of thumb that I have for working with 3D objects in Illustrator from scratch is to always make your base object grey to start out with. Illustrator makes information technology easy to run into highlights and shadows on your 3D objects if y'all utilize grayness. In RGB, I chose 150, 150, 150 as the values, which make greyness. Any time y'all choose the same RGB values when they are annihilation other than 0 or 255, the result will be a shade of grey.

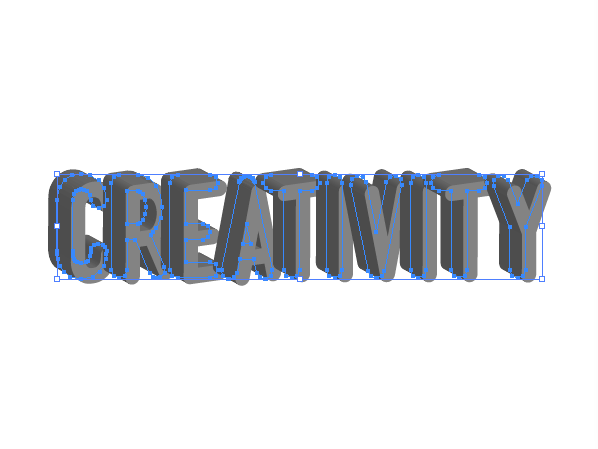
Yous tin practice one of 2 things in this next step. The get-go choice is to go to Objects> Expand and expand the text to make them into vector shapes. The other option it to go to Type> Create Outlines. Either i will exist fine, and then you can, while all of the text is selected, become to Object> Ungroup. Now all of your letters are individual shapes. I am going to select them all and utilise a global 3D setting to all of the letter shapes at the aforementioned time. Later, I will show you how to go back and edit each i individually without affecting the others. When you are set up, go to Effects> 3D> Extrude & Bevel.

The dialog box higher up will come up. Be sure to bank check the Preview button in the lesser left corner, otherwise you won't be able to come across what your 3d Object looks like until yous click ok, which is annoying and counter productive. The cube can be dragged and rotated, which is prissy. You lot can as well input positive and negative values in the boxes next to the cube for a more precise adjustment I like working visually, and then I conform the values to make refinements. The results are shown below.
Below, you can see that I am making some adjustments to our text. I lowered the extrude depth to thirty because the depth was too thick. The messages ended upward looking funny. I set the bevel to Tall Rounded, which rounds the very edges of your objects. There are other options that can produce some interesting results. You should play around with those options and see what you get.

I also set the perspective to -120°, which alters the vanishing bespeak perspective of your 3D objects in illustrator. This can produce some dramatic results and actually create powerful 3D imagery.

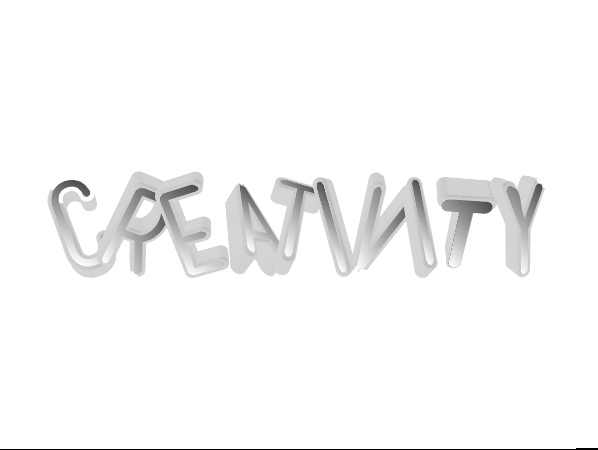
The messages in a higher place are the results, which is fine. I similar the white smooth on the top bevel, because it gives the text almost a metal quality. Still, I am going to testify you lot how to alter each letter. Click on the outset single letter. So, go to the Appearance Console and as you lot can come across in the prototype below, 3D Extrude & Bevel are displayed as a colored link. For more data on how the Appearance Panel works, see my in depth tutorial. Simply click on the link to open upwardly the current settings on your 3D objects in Illustrator.

The 3D Panel will open up back upward once again and you can make adjustments. Click and elevate the cube to rotate it, positioning it how you like. Notation: you volition take to click the preview checkbox each time to see your changes (I know, that is kind of annoying). Yous tin likewise adjust each colour individually for your type. Change the shading color to custom (I chose 6D6D6D), and you tin can conform the shading for each letter. Beingness able to exercise this manually gives yous a lot of control over the look of your 3D work.

When you are done, you can likewise click the fill color on your Tools Panel and alter the color there. If y'all go over to the Gradient Panel, you can set the original text color to be a slope. Note that this changes the original second shape, not the extrusion. Y'all tin can't employ a gradient swatch to your extrusion, because that will mess with Illustrator'south lighting effects. below are our letters with the slope practical equally the base color.
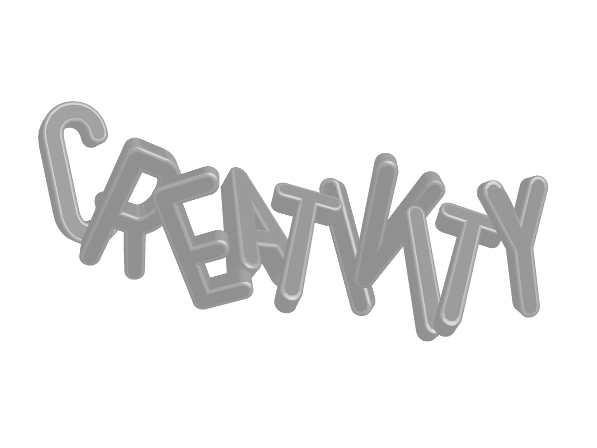
That is ugly, so let'due south select all of our text and select a solid grey for our fill color for now. We can e'er go dorsum and modify the shading colour and the fill up color for each alphabetic character to get the look we want. Below th prototype shows you that y'all can prepare the Fill Color all at once for your 3D objects in Illustrator.

Now, we tin modify the position of each letter on the page past clicking and dragging. If y'all desire one letter to be in forepart or behind other messages, simply get to Object> Arrange> Send to Back, Transport Backward, Send Forward, or Send to Front end. Arrange your letters how you want and stack them creatively. If ane of your 3D objects isn't positioned how you want, only go to the Appearance Panel, get back into your 3D settings and rotate the cube(Recall to check the preview box) until it works well with the other messages. below is what my text looked similar after repositioning each letter. Also, save before y'all to this, but y'all can select all of the letters, and while belongings shift, you can proportionally scale your vector 3D letters to make them larger or smaller.
Adjacent, we tin add together a few finishing touches on our text blueprint. Select all of the text and click on the Fill Color. Choose the color y'all want for your overall text(mine is #AB4A9C). At present, we can adjust the lighting on our objects by using the 3D Panel, and you tin click and drag the dot on the sphere shown in the example below to change the angle of your lighting for each letter of the alphabet. This allows you lot to change and adjust the lighting for each letter individually. I am leaving the shading at gray, just if yous actually want to, y'all can change the shading color to a night majestic. That is up to y'all. Lite intensity determines how bright your calorie-free source is. Ambient light determines how much other low-cal is filling the surface area. Highlight intensity determines how harsh the shiny areas are on your 3D objects in Illustrator. Highlight size determines how large the highlights actually are. this allows you to restrict them from beingness too wide. Alloy steps will blend the color gradations in your 3D objects in more steps for a smoother slope. Keep in mind that the more blend steps you take, the more memory you will be using and the higher the native file size will be.

Adjacent, let's select the Rectangle Tool and depict a rectangle that goes beyond the entire canvass. Go to the Gradient Panel and choose Radial. Next, click on the left swatch in the slider and become to the Colour Panel and change it to what you want the bright color of your slope to be ( I chose #FFF200). Then echo the process for the other swatch and cull your dark color (I chose #FFC60B). With the rectangle selected, go to Object>Arrange> Send to Dorsum. Save your file, and y'all are finished.

Determination
The result shown higher up is from combing several techniques and using the ability to manipulate 3D objects in Illustrator individually or as a group. Having the ability to rotate messages individually and arrange each objects lighting has enabled us to create an interesting 3D typography.
Click Below to Download the Source File

Save
Save
Source: https://creativebeacon.com/how-to-edit-3d-objects-in-illustrator/
0 Response to "how to draw a 3d flower in illustrator"
Post a Comment